Get Started With Wix for Homepage Residents
Purpose
Welcome to my Homepage residents can use this guide to help log in and use the residency Wix site.
Getting Started
- Follow the collaborator link to the Wix site.
- Log in. Make a new account if necessary.
- The My Sites dashboard displays all the Homepage sites. At the top, find a blank template with your name. In this example, “Upcoming-name” is the blank template.
- Hover over your template and click Select & Edit Site.
- At the top right, click Site Actions > Edit Site.


Wix Basics
- When you open the template, it should look like this:
- At the top left, a pull-down tab lists all the site’s pages. Each site comes with two pre-built pages:
- About
- Guest Room View
- You can add as many pages as you like.
- At the left, this sidebar is the easiest way to navigate through your site. Use this sidebar to:
- Access your pages
- Create new pages
- Add and edit images
- Add and edit videos and other content
- Add and edit text
- and more!
- Use the sidebar on the right to fine-tune items. For example, you can easily copy/duplicate objects and resize or reposition them. It’s very helpful for centering things evenly.


Using Wix Tools
Images
Let’s play with what we can do so far. In the screenshot below, when I click on the plant, several buttons appear. You can:
- Change the image
- Add a frame
- Edit the settings
- Crop the image
- Add filters
- Add a link
- and more!

When you move and/or stretch an image, guidelines appear. These help you center the image and understand its location on the screen.

Text
Now let’s move on to editing text. To change anything, such as fonts or other text effects, click on the text box and then Edit Text.


The Wix text editor functions similarly to a Word document. You can even add your own fonts if you want.
Tip:
- Sometimes, you must highlight the text in the box and then make changes.
- For example, if you are trying to change formatting after writing, first you must highlight the text.
- For example, if you are trying to change formatting after writing, first you must highlight the text.
- To add dynamic animations, when you select an asset, click the Animation icon. You can add animation to all assets, not just text.


Add a New Page
Adding a new page is easy!
- On the left sidebar, click the top button. The Site Menu displays.
- At the bottom of the Site Menu, click + Add Page. A menu of options pops up.
- Select a pre-made template to customize (the Gallery and About templates might be helpful to try) or start from a blank page.
- I’m going to add a blank page so I have a space to play around with for this demo. I’ll name it “media page.”
- You can add as many pages and subpages as you want.


Adding Media
Adding Images
Let’s start by adding images on our media page.
- On the left sidebar, click the “Plus” icon > Images > My Image Uploads.
- All the uploaded files to the Wix account display. It might be helpful to organize your uploads into a folder like some of our past residents have done.
- To add your own files, click + Upload Media.
- You can upload from a variety of sources such as Google Drive, Dropbox, or your desktop. Most file types are supported.
- You can upload more than one file at once by using Ctrl or Shift key (Mac or PC).
- Your uploaded files display at the top of the library. Select a file to perform simple editing, such as cropping or color correction.


Adding Video & Music
For video uploads, you can:
- Upload a file, Wix has a built-in player
- Insert from YouTube, Vimeo, etc

- On the left sidebar, click the “Plus” icon > Video & Music.
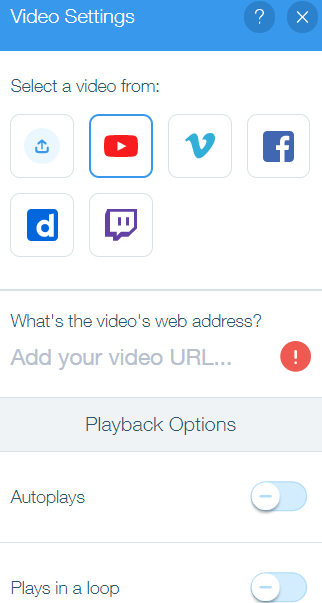
- Select video. Wix adds a generic video to your page. Click on it, and a menu displays.
- Under Video Settings, select the video source.
- You can also change options like looping and autoplay.

- '
- You can add music links in the same way.
- In the screenshot below, I zoomed out to get an overview of how my page is coming :)


Links
In the screenshot above, I’m going to take the thumbs-up cat and link it to the home page.
- Select the object you want to link and click the Link button. A pop-up menu appears.
- Note: For text, highlight the word(s) you want to link and click the Link button inside the editor.
- Select Page, then select the page in your site to link to. You can also connect to other websites like a portfolio, an email address, or a link can be made to go back up to the top of the page.
- This method is an easy way to connect different pages of your site, and can be done with various objects.

