Using the CRM
Purpose
In Airtable, the CRM (Customer Relationship Management) allows staff to look up individuals and view information about their relationship to MoHA. You can use the CRM to:
- Find a list of event attendees.
- Email a targeted group.
- Find all information about a specific person and their relationship to MoHA in one place.
- Quickly gather data on ticket sales, event attendance, membership, sponsorship, etc.
CRM Interface
The CRM Interface is a user-friendly interface built off of the CRM data and is useful for generating quick, high-level email lists by tags in the Main Tag field.
There are two sections:
- CRM Interface, for finding information.
- Updates, for updating information.
CRM Interface Menu
In the CRM Interface section, there are five ways to search and organize information about the MoHA community.
- CRM Summary
- Name Search
- Email Search
- Events
- Tags
CRM Summary
This view allows you to find high-level information by filtering through a variety of categories in the search bar at the top. You can search using a combo of and/or statements in these fields:
- Main Tag
- First name
- Last name
- Groups (tags)
- Events attended
Once you filter, the CRM returns information in a variety of fields. It supplies the following breakdown in most fields: Total, average, number, and average number). Some of the information the CRM returns is:
- Number of hits returned
- Total Support
- Event Attendance
- Donation
- Membership
- Volunteering
- Mailchimp (Includes subscribers, percentages, average member rating)
The CRM then provides a data table displaying high-level information and basic contact info. The Artist Data section displays the different events people in your search have participated in.
Name Search and Email Search
These two tabs fulfill the same function: they allow you to drill down on individuals. These tabs let you search by name and email for one person and then display all of the CRM data available. Info such as:
- Available contact info
- Tags and Groups
- Support
- Events
- Volunteer
- Membership
- Events
- Events linked in Wiki
Events
This section lets you display available information about a specific event. The CRM displays the following information for each event you select:
- Number of attendees
- Date of event
- Total admissions
- Copy/paste friendly email list
- Data table
Note: Attendees listed here are only those who paid a ticket or donated with their RSVP through Withfriends. The full list of attendees, regardless of if they paid or donated, for an event can be found in the Withfriends - Attendees table in the CRM Data.
Tags
This section lets you search by tag(s). You can pull the list of emails in plain text here. The CRM Interface here displays the following information:
- Global tags
- Description of tag
- Copy/paste friendly email list
- Data table
Updates
You can use this menu to update a contact's tags in the Main Tag field.
CRM Data
The CRM Data is the full database that the CRM Interface is pulling from. The data has automations and integrations within Airtable and with Withfriends and Mailchimp.
The top navigation bar displays four options:
- Data - The full database in table format
- Automations - Where Airtable automations for the CRM exists
- Interfaces - The CRM Interface
- Forms - Any forms that were created to add data into the CRM
Tables
Below the navigation bar are tabs for the tables. Below lists important info to know about the tables.
General
- In each table, the view at the top maintains the order of the fields and is the source of truth for data in that table.
- In the "Hide Fields" dropdown, fields are ordered in a way that makes sense. If you decide to add a field, place the field in a position that makes sense in the dropdown.
- Any table that has a thunderbolt icon before its name means that the table is synced or has integrations with another source outside of the CRM. Sources include other Airtable bases, Withfriends, Jotform, and Mailchimp.
- Do NOT mess with these tables. Ask Zac before doing so.
- Withfriends uses Zapier for integrations.
- Each Jotform has its own integrations page with the CRM and Mailchimp.
Do NOT touch (only view) the:
- KEEP AT TOP view. This view maintains the order of the fields across the rest of the views in the table.
- Views that are named in ALL CAPS
- Ex. Emails table > Utility folder > CRITICAL EDITABLE PROPERTIES view
- Views that include the words or are in a folder with the words "sync", "auto", "automation", "automations", "steps", "admin"
- Ex. Emails table > Sync folder > Donor Base view
- Views that are locked and have a lock icon next to the name
- Ex. Emails table > Automations folder > AUTO - Add Tags Automatically view
You can confidently:
- Search, filter, and sort views labeled "Search" or "Sandbox"
- Add or update records in the Manual Entry table
Emails Table
Emails are the unique identifier for each record. The Emails table is where views are set up for each tag. Each view shows fields that make sense for that tag if someone were to look for more information about a record. Fields shown can include:
- Testimonial (from Withfriends - Supporter)
- Most Recent Ticket (from Withfriends - Transaction Sync)
- Events Worked (from Volunteers (CRM sync))
- Notes
- MAIN TAG
- The final source of truth for each contact’s tags is the MAIN TAG property. Be careful with this property! It’s tied to many things, and Airtable is two-way synced with Mailchimp.
Notes Field
You can add notes to records in the Emails table. Notes can include:
- An individual's names, such as aliases, which names are okay to use publicly, and which ones are to be kept private on the backend
- Ex. Artist alias is CC, which can be used publicly. Real name is Carl Cat - DO NOT share publicly
- An individual's membership and status of membership in a MoHA Program, artist group, board, or organization
- Ex. CATS+ cohort
- Ex. Former MoHA Board member from 2015-2022
- Ex. Member of artist duo called Carl and the Cool Cats
- An artist group or organization's members
- Ex. Members include Carl, Dad, Mom, Tiger
Tags Table
The Tags table > Main view in the CRM Data displays all of the active tags and their:
- Point of Entry (POE)
- Relevant links on the Wiki or Jotform
- Process to update tags manually or through an automation
To create and add a completely new specific tag
- Go to the Tags table > Main view
- Name and add the new specific tag.
- Choose from the 5 Global tags. Do NOT change global tags.
- Follow the specific tag naming convention: "[GLOBAL TAG] | [SEGMENT]"
- Create the new tag under the right Global tag section.
- Fill out the other fields for the tag.
Manual Entry Table
The Manual Entry table > Manual Entry view is where you can manually add or update records, specifically if you want to add notes or tags to a record.
As mentioned, there are integrations that connect records between Withfriends, Mailchimp, and the CRM, so if it's working, there shouldn't be a need to do manual uploads. However, there are cases when data needs to be manually entered in, like:
- Written newsletter sign ups on a paper form.
- Program participant attendance tracking in a spreadsheet.
- Something went wrong with an integration and needs to be manually updated.
Add Tags to Records in the CRM
Make sure that when you are adding tags, what you type matches the existing tag exactly.
Add tags to one to a handful of records
There are two ways to do this:
- Go to the "Emails table > Add tags view"
- Search the contact's name.
- In the "Add a tag" field, choose which tag you want to add by clicking [+] in the cell.
Or
- Go to the "Manual Entry table > Manual Entry view"
- Enter people, with the right email, then add one tag to the MAIN TAG (MANUAL ENTRY) field.
- Then that field will update the rest of the tables and info.
Add tags to many records in bulk
- Identify which tags to update
- Collect contacts to update or add for each tag. You'll need both names and emails.
- Ask program leads for the info.
- Go to Airtable and filter through bases to collect info.
- Set up a spreadsheet for import with First Name, Last Name, Email, and MAIN TAG (MANUAL ENTRY) as header fields.
- MAIN TAG (MANUAL ENTRY) will be the tag you are looking to add to that contact
- Remove any whitespace
- Check for any duplicates
- Go to the "Manual Entry table > Manual Entry view"
- Copy the spreadsheet you set up.
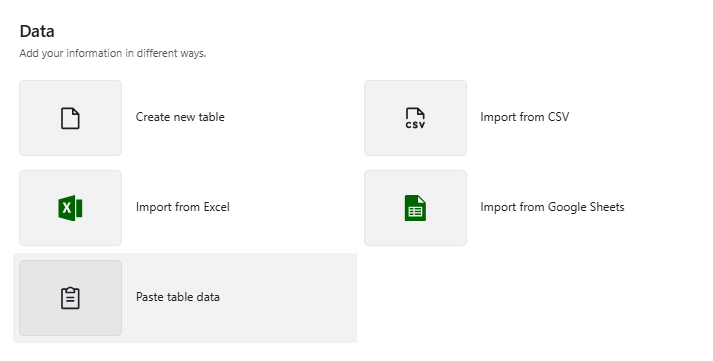
- Import the contents by clicking on:
- The "Add" button at the bottom-left corner of the table
- "Paste table data" option
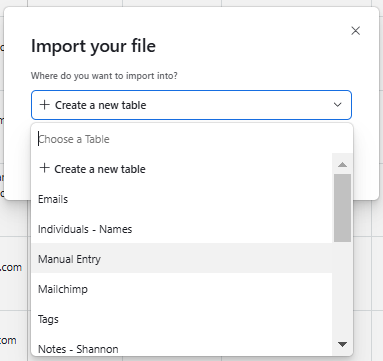
- Then paste the contents and click "Import pasted data"
- Import into the "Manual Entry table"
- Check that the fields were mapped right and exclude the first row if that is the header (don't import the header)
- If things look right, then click "Import"
- Wait a few seconds for Airtable to import and update the tags
Bulk remove tags
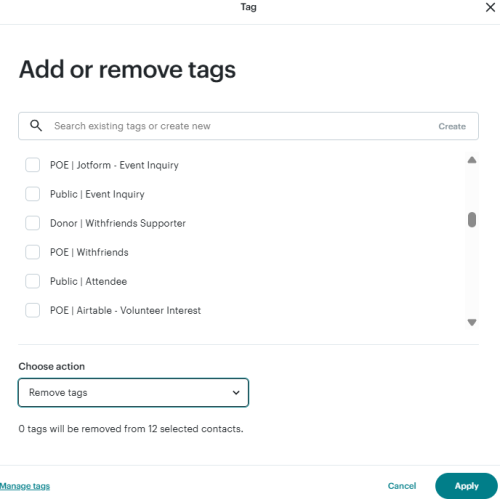
Currently, there is not a way to bulk remove tags from records in the CRM. However, you can bulk remove tags in Mailchimp. To do so in Mailchimp:
- Go to All contacts and filter for the contacts you'd like to remove tags from.
- Click on "Tag contacts" and a pop up will display
- In the pop up, change the "Choose action" to be "Remove tags"
- Click which tags you'd like to remove from the contacts selected
- Click the "Apply" button
Creating a Targeted Email List
To build more nuanced, targeted email lists inside the CRM, go to Data > Email. Since email is our unique identifier, the Email tab is the source of truth. In this tab, you can create Custom Exports to make email lists by setting conditions using tags. Custom Exports allow you to create an exportable CSV list using specific and/or statements. Use the CRM Interface for quick stuff, and the DATA tab for more drilled-down stuff.


